Saiba mais: Guia do programador Front-End
Classe é uma estrutura que descreve estados e comportamentos de um determinado objeto.
No Javascript utilizamos uma função para criar a classe.
function listButton() {
}
Para criar propriedades podemos usar a palavra var ou this. Se utilizarmos a palavra var o atributo vai ficar privado e se utilizarmos a palavra this o atributo vai ficar publico.
function MyClasse() {
    var nome;

    this.idade;
}


function document_OnLoad() {
    oMyClasse = new MyClasse();

    oMyClasse.idade = '10';
}
Para passar parâmetros para o construtor da classe.
function MyClasse(value) {
    this.idade = value;
}

function document_OnLoad() {
    oMyClasse = new MyClasse('10');
}
Podemos criar duas formas de criar métodos para nossa classe. Utilizando prototype que é um recurso do Javascript que possibilita modificar uma classe depois de que ela foi criada e outra forma é criar uma função dentro da classe.
function MyClasse(value) {
    var atributo = value;
}

MyClasse.prototype.getAtributo = function () {
    return atributo;
};

function document_OnLoad() {
    oMyClasse = new MyClasse('teste');

    alert(oMyClasse.getAtributo());
}
function MyClasse(value) {
var atributo = value;
this.getAtributo = function () {
return atributo;
};
}
function document_OnLoad() {
oMyClasse = new MyClasse('teste');
alert(oMyClasse.getAtributo());
}Para criar herança no Javascript vamos utilizar prototype, vamos transferir propriedades e métodos de um objeto para outro.
function Pessoa() {
    var nome;

    this.getNome = function () {
        return nome;
    };

    this.setNome = function (value) {
        nome = value;
    };
}

function PessoaJuridica() {
    var cnpj;

    this.getCNPJ = function () {
        return cnpj;
    };

    this.setCNPJ = function (value) {
        cnpj = value;
    };
}

function PessoaFisica() {
    var cpf;

    this.getCPF = function () {
        return cpf;
    };

    this.setCPF = function (value) {
        cpf = value;
    };
}

PessoaFisica.prototype = new Pessoa();
PessoaJuridica.prototype = new Pessoa();

function document_OnLoad() {
    oPessoaFisica = new PessoaFisica();
    oPessoaJuridica = new PessoaJuridica();

    oPessoaFisica.setCPF('111111');
    oPessoaFisica.setNome('João');

    oPessoaJuridica.setCNPJ('222222');
    oPessoaJuridica.setNome('Empresa');

    alert(oPessoaFisica.getNome() + '\n' +
          oPessoaFisica.getCPF() + '\n' +
          oPessoaJuridica.getNome() + '\n' +
          oPessoaJuridica.getCNPJ());
}
Agora vamos criar um método para criar um botão e adicionar no elemento body da página. Vamos utilizar o método createElement do elemento document. Levei um tempo para aprender como adicionar uma função em um evento criado no objeto, precisamos criar uma variável para chamar uma propriedade ou método da classe, se mantivermos a palavra this a função não vai achar os métodos e propriedades da classe.
<html>
    <head>
        <title></title>
        <script language="javascript" type="text/javascript">
            function Pessoa() {
                var nome;

                this.getNome = function () {
                    return nome;
                };

                this.setNome = function (value) {
                    nome = value;
                };
            }

            Pessoa.prototype.criarBotao = function (objRecipiente, value) {
                var objButton = document.createElement('INPUT');

                objButton.value = value;
                objButton.style.width = '150px';
                objButton.style.height = '70px';
                objButton.className = 'buttonAp';
                objButton.type = 'button';

                var self = this;
                objButton.onclick = function () { alert(self.getNome()); }

                objRecipiente.appendChild(objButton);//Adiciona o elemento
                no elemento recipiente.
            }

            function PessoaJuridica() {
                var cnpj;

                this.getCNPJ = function () {
                    return cnpj;
                };

                this.setCNPJ = function (value) {
                    cnpj = value;
                };
            }

            function PessoaFisica() {
                var cpf;

                this.getCPF = function () {
                    return cpf;
                };

                this.setCPF = function (value) {
                    cpf = value;
                };
            }

            PessoaFisica.prototype = new Pessoa();
            PessoaJuridica.prototype = new Pessoa();

            var oListButton1;
            var oListButton2;

            function document_OnLoad() {
                oPessoaFisica = new PessoaFisica();
                oPessoaJuridica = new PessoaJuridica();

                oPessoaFisica.setCPF('111111');
                oPessoaFisica.setNome('João');

                oPessoaJuridica.setCNPJ('222222');
                oPessoaJuridica.setNome('Empresa');

                oPessoaFisica.criarBotao(document.body, 'Fisica');
                oPessoaJuridica.criarBotao(document.body, 'Juridica');
            }
        </script>
    </head>
    <body onload="document_OnLoad();">

    </body>
</html>
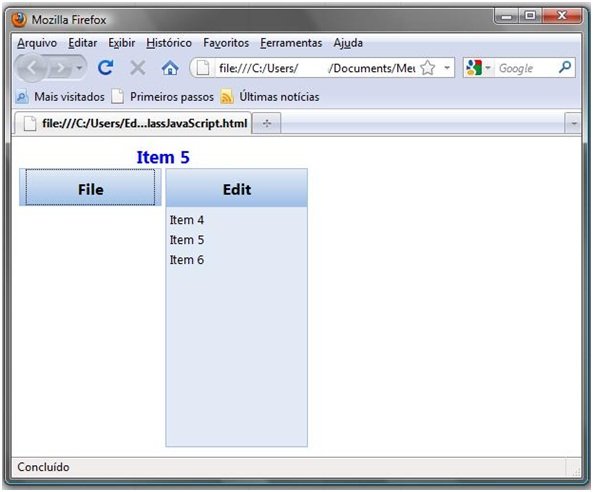
Criei um exemplo que criar um botão com uma lista de itens, quando o cliente clica no botão é expandido uma lista, quando o cliente o clica de novo a lista é recolhida.
.buttonAp
{
    color: #000000;
    font-family:Segoe UI, Tahoma, Sans-Serif;
    font-size:12pt;
    font-weight:bold;
    border-right: #A0C0E7 1px solid;
    border-top: #A0C0E7 1px solid;
    border-left: #A0C0E7 1px solid;
    border-bottom: #A0C0E7 1px solid;
    background: -moz-linear-gradient(top, #E2EBF5, #A0C0E7); /* for Firefox */
    background: -webkit-gradient(linear, left top, left bottom, from(#E2EBF5), to(#A0C0E7)); /* For Webkit Browsers */
    filter: progid:DXImageTransform.Microsoft.gradient(startColorstr='#E2EBF5', endColorstr='#A0C0E7'); /* for IE */
}

.listButton
{
    border-right: #A0C0E7 1px solid;
    padding-right: 1px;
    border-top: #A0C0E7 1px solid;
    padding-bottom: 1px;
    padding-left: 1px;
    border-left: #A0C0E7 1px solid;
    padding-top: 1px;
    border-bottom: #A0C0E7 1px solid;
    background-color: #E2EBF5;
}

.fontItemListButton
{
    color: #000000;
    font-family:Segoe UI, Tahoma, Sans-Serif;
    font-size:10pt;
}function itemListButton(text, value) {
this.text = text;
this.value = value;
}
function listButton(id, value, width, height, widthList, heightList) {
this.id = id;
this.value = value;
this.width = width;
this.height = height;
this.widthList = widthList;
this.heightList = heightList;
this.items = [];
this.objDiv;
this.isOpen;
this.openListheight;
this.OnSelectedIndexChanged;
}listButton.prototype.addItem = function (text, value) {
var oItemListButton = new itemListButton(text, value);
this.items[this.items.length] = oItemListButton;
};
listButton.prototype.removeItem = function (index) {
this.items.splice(index, 1);
};
listButton.prototype.clearItem = function () {
this.items = [];
};
listButton.prototype.getItem = function (index) {
return this.items[index];
};
listButton.prototype.item_MouseOver = function (obj) {
obj.style.backgroundColor = "#FFE6A0";
};
listButton.prototype.item_MouseOut = function (obj) {
obj.style.backgroundColor = '';
};
listButton.prototype.openList = function () {
if (this.openListheight < parseInt(this.heightList)) {
this.openListheight += 20;
this.objDiv.style.height = this.openListheight;
setTimeout(this.id + ".openList()", 5);
}
else {
this.objDiv.style.height = this.heightList;
}
}
listButton.prototype.closeList = function () {
this.openListheight -= 20;
if (this.openListheight > 0) {
this.objDiv.style.height = this.openListheight;
setTimeout(this.id + ".closeList()", 5);
}
else {
this.objDiv.style.height = this.heightList;
this.objDiv.style.display = 'none';
}
}listButton.prototype.item_Click = function (obj) {
this.openListheight = parseInt(this.heightList);
this.closeList();
this.isOpen = false;
var index = parseInt(obj.attributes['indexItem'].value);
if (this.OnSelectedIndexChanged != null) {
this.OnSelectedIndexChanged(this.items[index]);
}
};
listButton.prototype.objButton_OnClick = function (objPosition) {
if (!this.isOpen) {
this.objDiv.style.display = 'block';
this.objDiv.style.top = (objPosition.offsetTop + parseInt(this.height));
this.objDiv.style.left = objPosition.offsetLeft;
this.objDiv.style.height = 0;
this.openListheight = 0;
this.openList();
this.isOpen = true;
}
else {
this.openListheight = parseInt(this.heightList);
this.closeList();
this.isOpen = false;
}
};listButton.prototype.createButton = function (objRecipient) {
var objImgPosition = document.createElement('IMG');
objImgPosition.style.position = 'absolute';
objImgPosition.style.visibility = 'hidden';
var objButton = document.createElement('INPUT');
objButton.value = this.value;
objButton.style.width = this.width;
objButton.style.height = this.height;
objButton.className = 'buttonAp';
objButton.type = 'button';
var self = this;
objButton.onclick = function () { self.objButton_OnClick(objImgPosition); }
this.objDiv = document.createElement('DIV');
this.objDiv.style.position = 'absolute';
this.objDiv.style.left = 0;
this.objDiv.style.top = 1;
this.objDiv.style.width = this.widthList;
this.objDiv.style.height = this.heightList;
this.objDiv.style.display = 'none';
this.objDiv.style.overflow = 'auto';
this.objDiv.className = 'listButton';
var objTable = document.createElement('TABLE');
var objTBody = document.createElement('TBODY');
objTable.style.width = '100%';
for (var index = 0; index < this.items.length; index++) {
var objTr = document.createElement('TR');
var objTd = document.createElement('TD');
objTd.className = 'fontItemListButton';
objTd.innerHTML = this.items[index].text;
objTd.setAttribute('indexItem', index);
objTd.onmouseover = function () { self.item_MouseOver(this); }
objTd.onmouseout = function () { self.item_MouseOut(this); }
objTd.onclick = function () { self.item_Click(this); }
objTr.appendChild(objTd);
objTBody.appendChild(objTr);
}
objTable.appendChild(objTBody);
this.objDiv.appendChild(objTable);
objRecipient.appendChild(this.objDiv);
objRecipient.appendChild(objImgPosition);
objRecipient.appendChild(objButton);
};<html>
<head>
<title></title>
<link rel="stylesheet" href="MainStyleSheet.css"
type="text/css" />
<script language="javascript" type="text/javascript"
src="ListButtonJScript.js"></script>
<script language="javascript" type="text/javascript">
var oListButton1;
var oListButton2;
function document_OnLoad() {
var widthList = '146px';
if (window.ActiveXObject) {//The ActiveXObject object
is used to create instances of OLE Automation objects
in Internet Explorer on Windows operating systems.
widthList = '150px';
}
oListButton1 = new listButton('oListButton1', 'File',
'150px', '40px', widthList, '250px');
oListButton1.OnSelectedIndexChanged =
oListButton1_SelectedIndexChanged;
oListButton1.addItem('Item 1', '1');
oListButton1.addItem('Item 2', '2');
oListButton1.addItem('Item 3', '3');
oListButton1.createButton(document
.getElementById('recipient1'));
oListButton2 = new listButton('oListButton2',
'Edit', '150px', '40px', widthList, '250px');
oListButton2.OnSelectedIndexChanged =
oListButton2_SelectedIndexChanged;
oListButton2.addItem('Item 4', '1');
oListButton2.addItem('Item 5', '2');
oListButton2.addItem('Item 6', '3');
oListButton2.createButton(document
.getElementById('recipient2'));
}
function
oListButton1_SelectedIndexChanged(oItemListButton) {
document.getElementById('itemLabel').
innerHTML = oItemListButton.text;
}
function
oListButton2_SelectedIndexChanged(oItemListButton) {
document.getElementById('itemLabel').innerHTML
= oItemListButton.text;
}
</script>
</head>
<body onload="document_OnLoad();">
<table cellpadding="0" cellspacing="0" border="0">
<tr>
<td align="center" colspan="3">
<label id="itemLabel" style="color:
Blue;font-family:Segoe UI, Tahoma,
Sans-Serif;font-size:14pt;font-weight:
bold;"> </label>
</td>
</tr>
<tr>
<td id="recipient1">
</td>
<td>
</td>
<td id="recipient2">
</td>
</tr>
</table>
</body>
</html>Objeto criado no browser.

Links Úteis
- Download do Google Chrome: Faça o download do Google Chrome
- Javascript: Site oficial do JavaScript
- Site Oficial do PHP: O PHP (um acrônimo recursivo para PHP: Hypertext Preprocessor) é uma linguagem de script open source de uso geral, muito utilizada, e especialmente adequada para o desenvolvimento web e que pode ser embutida dentro do HTML.
Saiba mais sobre Javascript ;)
- JavaScript Tutorial: Neste artigo veremos como utilizar o código javascript em nossas aplicações web e websites. Teremos uma introdução à essa maravilhosa linguagem que cada vez mais cresce no desenvolvimento web.
- Preparando o ambiente para programar em PHP: Neste curso vamos aprender a preparar um ambiente de programação para PHP. Para isso, instalaremos um servidor web (Apache), o interpretador PHP e banco de dados MariaDB (MySQL). Todos esses componentes serão instalados em conjunto através do XAMPP.
- Debugando seu código com Google Chrome: Veja nesse artigo como usar a ferramenta de Debug do Google Chrome a seu favor.


